CLICK HERE FOR FREE BLOGGER TEMPLATES, LINK BUTTONS AND MORE! »

Monday, March 29, 2010

Easter basket (with a template and a tutorial)

Hi Fellow Crafter's

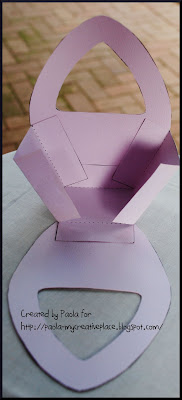
I decided that making the "Easter Egg" cookies (from the previous post) as an Easter gift from the kids to the grandparents might be a good idea, so I set about designing a basket to present the cookies in. This is what I came up with.


And this is what I did:

1. Grab the templates at the end of this post and print them out directly onto the card stock you want  
    to use.
 2. Cut the pieces out inside the black lines.
3. Using a craft knife cut out the handle of the basket.
4. Take the base and side template and cut along the solid lines and score along the dotted lines.

5. Take the scored base and side piece and make crisp folds along the scored lines.
6. Take the front and back basket pieces and glue them to the middle flap.
7. Fold the two middle pieces up and glue the two side flaps to them, at an angle.
8. This is what the glued together basket will  look like from various angels.


9. Embellish as desired.
    I used some designer paper from my stash for the front which I cut the same shape as the bottom 
    half  of the template. I also chalked the edges of the template with lilac. I then finished the basket
    off with some ric rac tied right around the rim of the basket, a felt flower and a mini flower button.
 
FREEBIE: Remember - right click on the images below and Save image as.... to make it your own (Personal use only please).


Happy Easter crafting.


Sunday, March 28, 2010

Easter baking

Hi Fellow Crafters

Yesterday the kids woke up thinking it was Easter Sunday and they were ready to go egg hunting :-) So you can imagine their disappointment when I told them they still had to wait another whole week. I decided that to lessen the disappointment,  a fun Easter related activity was in order. My boys love baking so I decided to whip up some Shortbread cookies, with their help, in the shape of Easter eggs for them to decorate.

This is a very simple one I use.

Recipe:
Ingredients:
600 grams plain flour (sifted)
240 grams icing sugar (sifted)
420 grams butter

How To: 
1. Cream icing sugar and softened butter together well.
2. Add the flour and mix well. (I use my K-beater attachment during this step) 

3. Roll the dough out on a well floured surface. Either into a sausage and cut into circles or roll out flat 
    and use cookie cutters.
Bake at 180C for 10 to 15 minutes.


When it came to cutting out the cookies I wanted an egg shape but don't have an oval cookie cutter. I needed to get creative and this is what I did. 
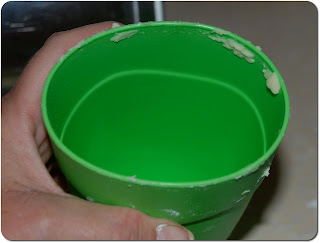
1. I took a plastic cup.


2. I squeezed the top lip of the cup until it formed an oval.


3. I used this to cut out my oval "egg" cookies.

I also had a bunny and a chick cookie cutter which we used as well. 


For the decorating I decided to make some running icing so the boys could "paint" their "eggs". For this I took three bowls and placed a cup of sifted icing sugar into each I then got the boys to add food coloring and water and stir. The water was adjusted after stirring to make the icing runny enough for use.


The boys then got decorating.


And viola- painted egg cookies, bunnies and chicks.


Needless to say the boys had a blast. What a surprise, a lot of icing was consumed before it even got onto the biscuits!


Happy Easter Crafting.

Burrowing bunny

Hi Fellow Crafters

I used the same flower pot pattern as I did for my baby shower bay socks to make an Easter egg- burrowing bunny.

Find pattern for the flower pot here.


I simply placed an egg (broadest end up) into the pot and decorated it with two paws and a cotton wool tail secured in place with some tacky stuff. I think these would be cute as gifts or even as an Easter centerpiece.

Happy crafting

Friday, March 26, 2010

Easter crafting with my class

Hello Fellow Crafters

Well here n South Africa we have school holidays for two weeks, starting from today. So I have spent the last week making Easter crafts with my class of 3 year olds. Here are the things we made.

First up is what I call a "Rocking Chick". This chick is made by folding a paper plate in half, getting a set of each child's hand prints for the tail feathers and using a circle for the head and a triangle for the beak. As the name indicates when the chick is placed on a flat surface it be pushed so that it rocks to and fro on its own.


Second is a chick, still in its nest, which is newly hatched. Due to the age of the children in the class I tried incorporating the symbols of Easter i.e. chicks = new life and at  Easter Jesus gives us new life as discussing the crucifixion and resurrection are not within a 3 year old's scope of understanding.

Thirdly we made these bunny egg holders, I sat with each child individually over a 2 day period making these as I wanted  them to do as much of the assembling as they could on their own. The bunny is assembled out of two long strips of paper which are bent into two tubes. I with copy off the pattern and post it later this weekend.

Here are a couple of other ideas from my co workers that I fancied:
This cross was made using egg cartons cut in the shape of a cross, ribbon was then used to criss cross down the length of the cross and Easter flowers were colored in and stuck onto the cross.

These crosses are printed onto a light yellow, lightweight paper and then painted with vegetable oil on the reverse side. You don't get the full effect from the picture, but the yellow becomes translucent and the light shines through the yellow making the cross and its detail stand out dramatically.

Saturday, March 20, 2010

Easter crafting with the kids

Hi Fellow Crafters

I had some ingredients left over from Bakers day with my class so I decided to make some bird nests (cute for Easter crafts) with my boys this morning.
To make the nests:
Ingredients:
100g  butter
4 Tsp syrup
200g  cornflakes
300g  cholcolate broken into pieces
marsh mellows
jelly beans/ chocolate eggs
(makes about 15-20 large nests)

Method:
1. Over low heat melt the butter, syrup and chocolate together, stirring continuously.
2. Add the cornflakes a little at a time, into the melted mixture, mixing well after each addition.
3. Let mixture cool slightly.
4. Scoop mixture into hand rolling it into a ball.
5. place into a cupcake liner and with your thumb press down in the middle to form an indent.
6. place eggs into your nest and if you like a little chick (I used a marsh mellow decorated with food
    coloring pens).


Happy Crafting