CLICK HERE FOR FREE BLOGGER TEMPLATES, LINK BUTTONS AND MORE! »
Showing posts with label Gifts. Show all posts

Thursday, September 16, 2010

Baby Gifts

Hi Fellow Crafters'

Here are some baby gifts I whipped up to give at a baby shower for a colleague on Saturday. I drew inspiration from around the web. As her baby decor is Winnie the Pooh I purchased some Winnie the Pooh print flannel and some polka dot jersey knit.
First up I made two receiving blankets, both single layer as we are heading into summer here. One I made of flannel and the other the jersey knit. I merely cut a rectangle measuring 90cm x 120cm. I bound the jersey knit blanket with satin binding.

I then found a fabulous pattern for a burp cloth here-> Homemade by Jill- so I decided to make a couple of them, 2 with the flannel and 2 with the knot, I backed all of them with a dark blue terry cloth.

 
Then I found a pattern for a sensory ball here-> The Purl Bee. I used the pattern for the smallest ball and decided to put a bell inside, I also used flannel, knit, terry cloth and polar fleece to give the baby different sensory feelings. I also put a loop of ribbon on the top of the ball so that links could be attached so that the ball can either be attached to a taggie blanket or the side of the pram.
I have posted about a taggie blanket before -> here. This time I used a single piece and made it 40cm x 40 cm and used blue polar fleece as backing, for a soft touch.
 To round off the the gift I made a theme related card. I took the easy way out and used some Pooh stickers from my scrapbooking stash and a onsie card template, I used a white marker to "stitch" on the onesie. The sentiment I used in the card reads- Sometimes it's the smallish things in life that take up the most room in our hearts- Winnie the Pooh


I hope she likes what I made for her!

Happy crafting

Monday, March 29, 2010

Easter basket (with a template and a tutorial)

Hi Fellow Crafter's

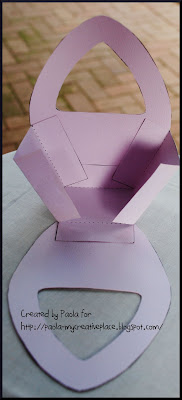
I decided that making the "Easter Egg" cookies (from the previous post) as an Easter gift from the kids to the grandparents might be a good idea, so I set about designing a basket to present the cookies in. This is what I came up with.


And this is what I did:

1. Grab the templates at the end of this post and print them out directly onto the card stock you want  
    to use.
 2. Cut the pieces out inside the black lines.
3. Using a craft knife cut out the handle of the basket.
4. Take the base and side template and cut along the solid lines and score along the dotted lines.

5. Take the scored base and side piece and make crisp folds along the scored lines.
6. Take the front and back basket pieces and glue them to the middle flap.
7. Fold the two middle pieces up and glue the two side flaps to them, at an angle.
8. This is what the glued together basket will  look like from various angels.


9. Embellish as desired.
    I used some designer paper from my stash for the front which I cut the same shape as the bottom 
    half  of the template. I also chalked the edges of the template with lilac. I then finished the basket
    off with some ric rac tied right around the rim of the basket, a felt flower and a mini flower button.
 
FREEBIE: Remember - right click on the images below and Save image as.... to make it your own (Personal use only please).


Happy Easter crafting.


Tuesday, March 16, 2010

Girl baby shower gifts

Hi Fellow Crafters

Run off my feet again, so this is a super quick post. Just some things I have made for a friends baby, still have to wrap it though.

Some burp cloths (pattern found HERE). Flannel on one side and terry cloth on the other.

A few baby socks rolled into flowers which I put into a flower pot (template found here). I decorated the lip of the pot with some punched out flowers and brads. The leaves are just some green card stock.

And some baby booties.


And here they are all together.


Happy crafting

Saturday, March 13, 2010

Happy Birthday

Hi Fellow Crafters

Things have been up side down around here lately, with starting work, visitors from abroad and out of town and sick kiddo's. So not much crafting going on.
However my new boss' birthday was on Thursday and I decided to make her a memorabilia pouch, she is off on holiday to London and Paris soon and I thought she could do with a little something to store all her tickets, brochures etc in. I made a VERY simple rectangular pouch and then got my class( the Lion class) to place their fabric paint covered thumb prints all over the pouch. I then decorated the prints as people and wrote their names beneath their prints.


I then needed a card to go with the gift so I used the same card as here (seeing that it has a lion ;-) -just changed the sweet baby to a pieced sun (Can you believe it - I didn't take a picture!). and on the inside I again used the kids thumb prints to sign the card. This time I turned the thumb prints into lions and lionesses.


And what would a gift be without packaging? For this I used this fab template from Papertrey Ink. I decorated with some DP I have had for some time that just happened to have lions on it. I also thought my boss could keep it on her desk later to keep letters or notes in, seeing as it is a mini file holder.


I also added a British adaptor in for a little extra from me.

Happy crafting.

Sunday, February 21, 2010

Sweet Baby "Peek-a-boo" baby blankie

Hi Fellow Crafters

I have never quilted before, but my sister is an avid quilter and I always love what she makes, so I decided to give it a try. Apart from been inspired by my sister there is also a plethora of very talented ladies around blogland that readily share their quilting talents.

I got the idea for the small blanket -> here ( great step by steps on how to assemble a mini quilt), and modified it to suit my requirements.

Having a few baby showers coming up in the near future I made the following tag "peek-a-boo" blanket ( so called as it can be used to play peek-a-boo with baby as suggested in the linked post).

I designed the lion piecing and decided that a matching card would just finish off the gift perfectly. I used Moda Fabrics for the quilt and core'dinations card stock for the card.


I added ribbon down the side of the card to compliment the "peek-a-boo" blankie. I stapled the ribbon along the edge of the back flap and decided that I did not like seeing the staples so I added a strip of orange card stock to the back piece to cover them.

I have not done a step by step as this POST has very good instructions. However I have included the pattern for the lion piecing and a diagram for dimensions of the "peek-a-boo" quilt (finished size 12" x 12").
 

FREEBIES:


Linked to 
 
Happy crafting