CLICK HERE FOR FREE BLOGGER TEMPLATES, LINK BUTTONS AND MORE! »
Showing posts with label Freebies. Show all posts

Saturday, November 27, 2010

Pop on over - freebies and a tutorial

HI Fellow Crafter's

After seeing this blog post on how to make your own microwave popcorn, I came up with the idea of using homemade micro popcorn as favors or even an invitation!

I settled on the idea of using them as an invitation to a Christmas movie marathon.


The back of the tag.


Here's what I did :
1. Take a brown paper bag. I had red ones so I used them. Place 1/4 cup of popcorn (your normal everyday one) into the bag.


2. Fold down the top edge twice and secure with a piece of sticky tape (no it does not melt in the microwave- if you were wondering :-) )

3. Sticky tape side up, fold both ends towards the center, overlapping slightly.
4. Embellish as desired. Place a note on the back that reads: (Free to use: Click and save)


Here is the tag for you to use: (Free to use: Click and save)


Some other ideas I have for the microwave popcorn.
- Gift as a DIY popcorn garland. Wrap a length of string with a needle around the micro popcorn.


- Gift as a Pop on over Santa request for your kids class mates.


Another suggestion if you only have the brown bags is to make a sleeve in a Christmassy color or using Christmas DP to go around your bag.

Happy Crafting.

Monday, March 29, 2010

Easter basket (with a template and a tutorial)

Hi Fellow Crafter's

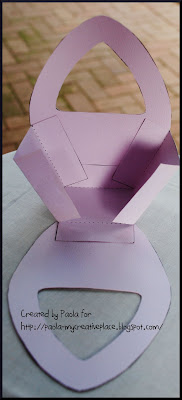
I decided that making the "Easter Egg" cookies (from the previous post) as an Easter gift from the kids to the grandparents might be a good idea, so I set about designing a basket to present the cookies in. This is what I came up with.


And this is what I did:

1. Grab the templates at the end of this post and print them out directly onto the card stock you want  
    to use.
 2. Cut the pieces out inside the black lines.
3. Using a craft knife cut out the handle of the basket.
4. Take the base and side template and cut along the solid lines and score along the dotted lines.

5. Take the scored base and side piece and make crisp folds along the scored lines.
6. Take the front and back basket pieces and glue them to the middle flap.
7. Fold the two middle pieces up and glue the two side flaps to them, at an angle.
8. This is what the glued together basket will  look like from various angels.


9. Embellish as desired.
    I used some designer paper from my stash for the front which I cut the same shape as the bottom 
    half  of the template. I also chalked the edges of the template with lilac. I then finished the basket
    off with some ric rac tied right around the rim of the basket, a felt flower and a mini flower button.
 
FREEBIE: Remember - right click on the images below and Save image as.... to make it your own (Personal use only please).


Happy Easter crafting.


Tuesday, March 2, 2010

Felt Fruit- Apple with template and tutorial

Hi Fellow Crafter's

Back with the promised apple pattern and tutorial.


OK straight onto the How To:
 1. Cut out the apple pieces using the pattern below the how to

2. Sew the two pieces together along the sides of the apple leaving the top and bottom straight edges
    open.

3. Turn inside out.

4. Run a gathering stitch around the top edge, being sure to insert the leaf before tightening and
   securing.

4. Fill the apple with polyester filling.

 5. Run a gathering stitch around the bottom, tighten and secure.


 6. Now take a longer needle - one that will fit through the apple from the top to the base easily. Take
     the needle and thread and insert it through the top of the apple, bringing it out through the bottom,
     I recommend pacing it back up to the to and pulling the thread in slightly to give the apple its
     shape.  Once you are happy with the shape secure.

And viola you have your apple.

And the whole bowl of fruit I put together:

Now for the apple Pattern:
You know what to do.... right click on the pattern as save image as..... 
FREEBIE
Happy Crafting

I am linking to Craft Schooling Sunday (see button in my side bar)

Sunday, February 28, 2010

Felt Fruit- Pear with template and tutorial

Hi Fellow Crafters

Keeping with my class theme - foods we eat, I came up with a pattern for a pear. My youngest squealed with joy when he saw the couple I made and promptly went to fetch his shopping basket from the toy room to "purchase" the newly made pears. Needless to say I was thrilled that he liked them and promptly designed an apple to go with the pears- but you'll have to wait until tomorrow for that template ;-)


OK, so let's get started with the HOW TO:
1. Cut out the pieces using the pattern at the end of the how to
 
2. Pin the leaf to the center of the top curve of one of the pieces, facing in and down (sorry no pic of
    this step)
3. Place the two pieces together, with the leaf on the inside and stitch around the pieces leaving the 
    bottom straight edge open.

    (Close up of the top to show the top of leaf sticking out a bit)
4. Turn inside out.

5. Fill the inside of the pear with polyester filling and run a gathering stitch around the straight edged 
   base.

6. Pull the gathered edge in tight and secure.
 
Viola you have your pear.

And know for the pattern:
You know what to do- right click on the image and save image as.... and it is all yours for personal use only please.